The void was a quiet place… Then boom, a bright light called “Ethereum” exploded, creating the galaxy, and many others, we all know and love(Ubiq, Stratum, etc).
Ever since I noticed light had finally re-shined down onto cryptocurrency(very late), I knew I had to build myself a rig. With a dream, and lot’s of “whattomine.com” refreshes, the $300 mining rig had appeared. Here’s how I did it.
Everybody, and their friend has an old machine sitting in their garage, basement or attic. With a low price cap, taking advantage of this is a must.
Obtaining The Rig
The conversation went something like…
“Hey, you saving that machine in the garage?”
“No, I should trash it actually…”
“I’ll take it off your hands.”
Boom. You have everything you need to mine! Right?
Unless you want to be bringing in under $1.00 USD a day, no.
Making It Hash Ready
In order to make the machine capable of bringing in some decent change, we need to pick up some new(extremely old) graphics cards.
I found the best way to do this, is to use the power of “Ebay“. It’s the best place to look for used cards, and decent deals.
After a few days of bidding, and contemplating, I picked up one “Stock HD 7970“, and one “280X Saphire Toxic Edition“.
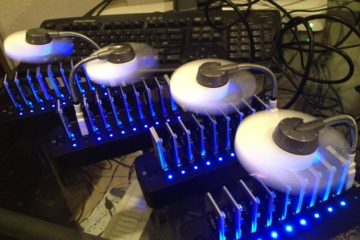
I had also invested in two “powered risers“, I found on Ebay. I decided these would be a good idea, as I want them to be outside of the case to reduce the risk of having my room explode.
After sketchily mounting the two cards outside the case, using a piece of wood zip-tied to the frame… I knew it was ready.
Hammer Hash Time
These cards are old, extremely old. This means their power consumption is bad(complete shit), and they have a very low hashing power(15 mh/s per card on ETH at the time).
I figured my best bet would be to find a non-mainstream coin with a low difficulty(so we can utilize our low hashpower). In my case, Ubiq. It looked solid, to me. It has a good development team, small community, and seems like a good idea to invest in.
Mining Ubiq, my little franken-rig pulled a stable 50+ mh/s after overclocking.
Over the course of a month and a half of running 24/7, I’ve picked up a little over 100 UBQ. Not bad.
Last week, the price of 1 UBQ, jumped up to $3.01(with 100 coins, this is just over $300 USD).
It took a month and a half for our crazy machine to reach the point in which we had gotten our full investment back.
In conclusion…
Obviously the price of 1 UBQ, had dropped back down around $2.50 USD. We could have gotten our full investment back(technically), however I believe it will be more profitable to hold my coins even longer. What if the price jumps up to $8.00 USD in the next year? Who know’s how much we could be missing out on.
Anyway, building a rig on a budget, is do-able. You don’t need to spend two grand on a ton of cards, and fancy motherboards.


3 Comments
Erik · March 8, 2018 at 4:48 pm
I am looking to do a similar budget setup. This may be a dumb question, but do you not need the video cards linked via SLI bridge or crossfire to mine using multiple cards?
Sid Engel · March 9, 2018 at 12:19 am
Hey Erik! Excellent question.
No, you are not intended to set up SLI connections for mining rigs. The mining software identifies each card on it’s own, and doesn’t need any additional help to use more than one card.
Sam P. · March 29, 2018 at 11:03 pm
Wow, this is impressive! I have seen mining rigs on YouTube and elsewhere online, but this one is a little different. I do not think I have the technical skills or general knowledge to do it myself, but it is certainly something to research and decide whether it is worth pursuing.